Push to AWS S3 Data Delivery Configuration
Capella’s Push to S3 feature enables automatic delivery of SAR imagery to customer-managed AWS S3 buckets. This guide walks Admins and Org Managers through configuring S3 bucket policies, optional SSE-KMS key policies, and Capella Console settings to enable direct delivery. The setup supports both AWS Commercial and GovCloud environments, with validation tools to confirm access.
Administrators and Organization Managers can optionally configure an organization to send Capella Space imagery directly to a customer managed Amazon Web Services (AWS) S3 bucket by enabling the Push to S3 option in the Admin UI.
Additionally, a bucket policy needs to be defined on the customer managed AWS S3 bucket using the AWS Management Console to provide Capella Space with the appropriate privileges to write data to the S3 bucket.
If SSE-KMS encryption is utilized on the customer managed S3 bucket, it is necessary to define a key policy to add permission for the ‘Capella role’ (Commercial) or ‘Capella service user’ (GovCloud) to use the KMS key.
When the Push to S3 option is configured for an organization, new tasking requests will automatically be delivered to the customer managed S3 bucket upon completion. For archive order requests, data can be delivered to the customer managed S3 bucket from the Order Details page in the Console UI.
This document summarizes the steps necessary to configure an AWS S3 bucket to receive imagery from the Capella Space platform.
Push to S3 Configuration Steps
1. Set up S3 bucket policy
- Log into the AWS Management Console
- Navigate to the S3 service
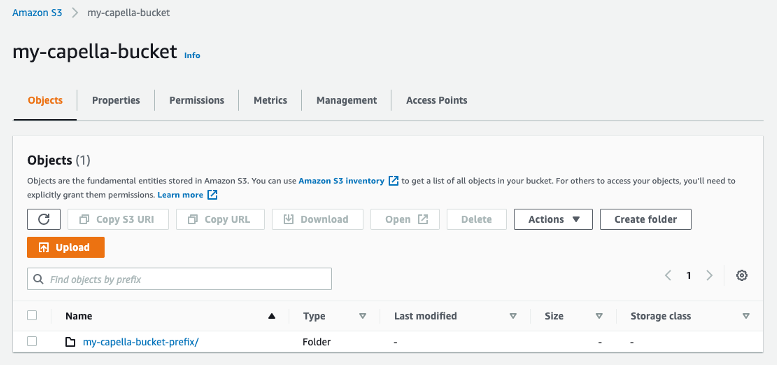
- Create a new S3 bucket or identify an existing S3 bucket to receive Capella Space imagery

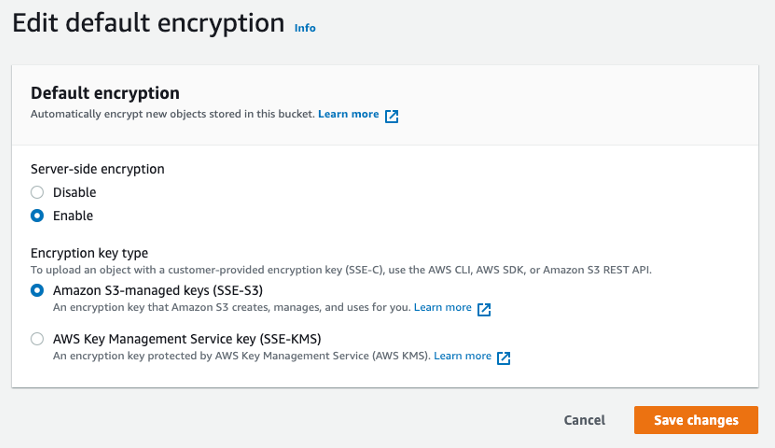
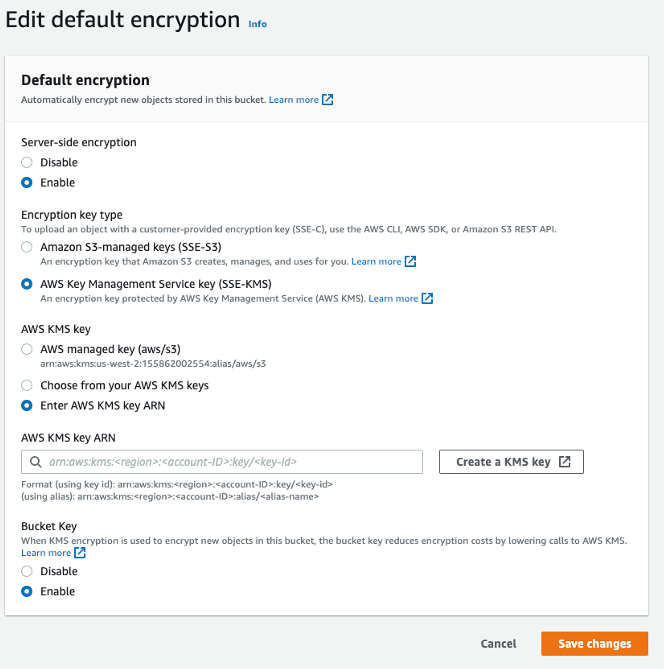
- Click on the Properties tab for the S3 bucket and click the Edit button for the Default encryption
Both Amazon S3-managed keys (SSE-S3) and AWS Key Management Service key (SSE-KMS) server-side encryption is supported (choose one).
Amazon S3-managed keys (SSE-S3) configuration properties

AWS Key Management Service key (SSE-KMS) configuration properties

- Click on the Permissions tab for the S3 bucket
- Ensure that the bucket is configured to Block all public access
- Navigate to the Bucket Policy section and click Edit
-
- OPTION A
-
-
- Commercial (your bucket is hosted in AWS Commercial partition)
-
In the Policy section, enter the following JSON (the same bucket policy applies whether you are using SSE-S3 or SSE-KMS encryption)
For the <CAPELLA_COMMERCIAL_CLOUD_BUCKET_POLICY_ARN> to include below, please contact Capella Support
The above configuration will permit imagery to be sent exclusively to the bucket prefix location in the configured bucket. Alternatively, it is also possible to configure the bucket policy to permit sending imagery to any prefix in the configured bucket through the following configuration (the same bucket policy applies whether you are using SSE-S3 or SSE-KMS encryption)
For the <CAPELLA_COMMERCIAL_CLOUD_BUCKET_POLICY_ARN> to include below, please contact Capella Support
-
- OPTION B
-
-
- GovCloud (your bucket is hosted in AWS GovCloud partition)
-
In the Policy section, enter the following JSON (the same bucket policy applies whether you are using SSE-S3 or SSE-KMS encryption)
For the <CAPELLA_GOV_CLOUD_BUCKET_POLICY_ARN> to include below, please contact Capella Support
- Click Save changes
2. Optional: Set up KMS key policy
If you are using SSE-KMS encryption with a Customer Managed Key (CMK), it is also necessary to edit the KMS key policy to add permission for the ‘Capella role’ (Commercial) or ‘Capella service user’ (GovCloud) to use the KMS key.
- Navigate to the Key Management Service
- Click on Customer Managed Keys (CMK)
- Locate the CMK selected in Step 1 (SSE-KMS configuration)
- In the Key Policy section, click Switch to policy view

- Add the following key policy
-
- OPTION A
-
-
- Commercial (your bucket is hosted in AWS Commercial partition)
-
For the <CAPELLA_COMMERCIAL_CLOUD_KEY_POLICY_ARN>, please contact Capella Support
CAPELLA_COMMERCIAL_CLOUD_KEY_POLICY_ARN>
-
- OPTION B
-
-
- GovCloud (your bucket is hosted in AWS GovCloud partition)
-
For the <CAPELLA_GOV_CLOUD_KEY_POLICY_ARN>, please contact Capella Support
CAPELLA_GOV_CLOUD_KEY_POLICY_ARN- Click Save changes
3. Set up Capella Console S3 push configuration
- Log into the Capella Console as an Administrator or an Organization Manager
-
- OPTION A
-
- Administrator
-
- OPTION A
-
-
-
-
- Navigate to the Admin UI
-
-
-
-
-
-
-
- Click on the Organizations button
-
-
-
-
-
-
-
- Find the organization to configure for Push to S3 and click on the Edit icon
-
-
-
-
-
-
-
- Click on the Edit Organization button
-
-
-
-
- OPTION B
-
-
- Organization Manager
-
-
-
-
- Navigate to the Organization view by clicking on the Organizations button

- Navigate to the Organization view by clicking on the Organizations button
-
-
-
-
-
- Click on the Details button
-
-
-
-
-
- Click on the Edit Organization button
-
-
-
-
- On the Edit Organization screen
- Find the Push to Amazon S3 configuration property

-
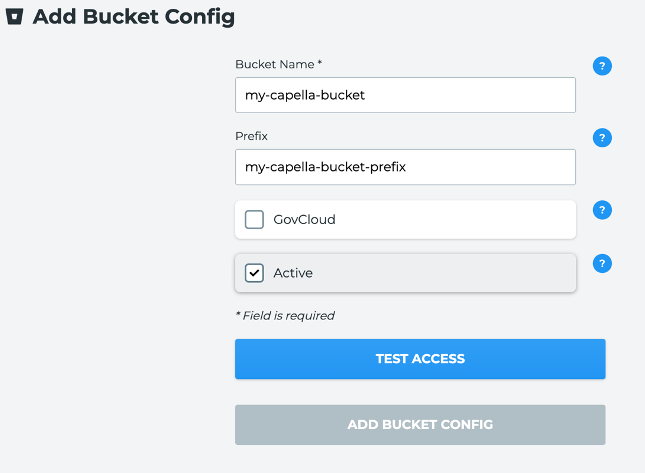
- Enable the Push to Amazon S3 configuration property and click the Add Bucket Config button
-
- Enter the Bucket Name and Prefix as was defined in the AWS Management Console

4. Validate Capella Console S3 push configuration
- Validate the bucket configuration by clicking on the Test Access button
- If configured correctly, you will receive the following message

NOTE: As part of a successful access test, you will see a s3-push-test.txt file saved to your bucket prefix in the AWS Management Console.

- If not configured correctly, you will receive the following message

- Once the Test Access is successful, click the Add Bucket Config button to complete the configuration